Undecking the Halls

20171211_204448Yes, I have been absent for a long while. It is truly amazing how busy one can be in retirement! But I haven’t abandoned this blog nor my Konmari process. In fact, having gone through the process, the basic principles are never far from my mind and never more so than during the consumer-driven Christmas season. Truly, it is difficult to pass very much up when shiny, glittery things are everywhere you look but my shopping was much more reserved this year. And when my husband and I asked each other what we wanted for Christmas, each of us answered quite honestly, “Nothing.” We really do have everything we need. But this post isn’t going to be about shopping and gifting but more about all the stuff that we have to make our homes look and feel festive.

.facebook_1515532349687
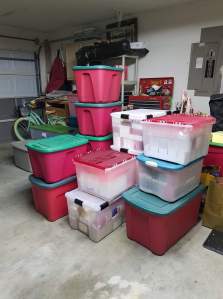
All of our Christmas stuff is stored in tubs up in the attic. Now if you remember, at one time I had ten tubs of t-shirts in this house so you can just imagine how many tubs of Christmas stuff there is. But last year I started to cut back and while we did purge some items, many I was not ready to part with even though I didn’t necessarily want to display all of them. Those items are now in tubs that are labeled, “Secondary Christmas”.  That way I know that those are decorations that I want to keep (for now) but didn’t make the cut to be displayed this year.

As we decorated, I found that there were even more things that I did not want to put out. Tastes and styles change and while these are things that I love and want to keep, they didn’t bring me joy in the space. Out to the garage they went to be put aside with the other “secondary” Christmas items. In the end, we were quite happy with the simpler decor and could honestly say that less was definitely more.

But no matter how much or how little you put up in the way of decorations it all has to come down. A mindful approach to packing up now will make next year’s unpacking that much easier.

Group by Location

For example, put all of the items that are displayed on your mantel in the same tub. For me, that meant the stockings, the stocking holders, and the lighted garland. Why? Well, if I put the garland for the mantel in a tub with the garland for the dining room, I’d have to go look for that garland before I could finish decorating the mantel. All of it in the same tub means I can put up the garland, the holders, and the stockings and be finished with the mantel before moving on. I have tubs labeled mantel, dining room, front door, etc. Storing items according to where they’ll be displayed will keep you from having to open every tub you have to find the one piece you need to finish decorating a specific spot.

My exception to this? My nutcrackers. I have a special storage box that only holds nutcrackers, so even though they go on the mantel, they don’t need to be in that tub. I can still access them easily.

Discard/Repair Damaged Items Now

If something can be fixed easily, fix it before you store it so that it’s ready to go next year. If not, retire it to your secondary items or discard it if it’s not that important to you. I had a string of lights go out that I use on a ladder shelf. When I took them down, I tossed them – they’re inexpensive enough that it’s not worth finding the bad bulb. Then I added it to the list of things I know I need to purchase next holiday season. That list will go in my calendar so that I know to buy a new set of lights BEFORE I start decorating next year.

Label the Tubs

Get a good Sharpie or very strong labels and note what is in each tub. That way when you bring them all into your house next year, you can put the tubs in the room or location where they are going to be needed.

Ornaments


.facebook_1515531408246
Just some of the unboxed ornaments

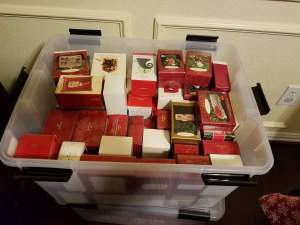
I am an ornament addict. I should own stock in Hallmark. The tree is my favorite of all the Christmas decorations and I could probably outfit more than just the one we have. It always makes me chuckle when I see the tubs marketed as “ornament containers” with the dividers designed to keep all the ornaments safe and neat because the reality is, those are made for 2-inch glass balls – and I have NONE of those on my tree.


My friends think I’m crazy but I actually keep all of my Hallmark ornaments in their original boxes in whatever tissue or plastic is inside that box. Why? They’re safer that way. Ornaments are fragile and keeping them in their original packaging protects them from being knocked against other ornaments. And it’s much easier to pack those boxes into a tub. It’s kind of like a game of Tetris when I’m finished but those little boxes are safe and secure.

.facebook_1515531837363
Tub 1


For the ornaments that did not come in a box, I do use the ornament dividers with tissue paper and/or bubble wrap. I just don’t want them rolling around on their trips up and down the attic stairs.

Packing and unpacking our ornaments is the most time-consuming job of the holiday but I absolutely love my tree so it is worth it. But again, the only thing in these tubs are ornaments and spare ornament hooks because the tree is actually the last thing I put up and the last thing I take down. Those tubs can stay out of the way while I’m working on decorating other areas of the house.

It’s perfectly okay to retire or discard those ornaments that don’t bring you joy. Honestly, I don’t have too many of those but there were some that I didn’t put on the tree because I felt like we’d outgrown them. Mostly, they were ornaments that were given to my daughter as she was growing up and they will someday adorn her own tree. So now that she has a place of her own, I put her ornaments into a separate tub to be given to her when she has a family (or at least more storage!).

Wrapping it Up

20161212_154307The last thing I do is go through the tubs that contain all of my wrapping essentials – bags, tissue paper, gift tags, etc. Toss out bags or paper that are wrinkled or torn. It will come as no surprise that I store my bags in order of size so I can easily grab the one that I need. My ribbon and bows are in a separate tub. Toss out spools that don’t have enough left on them to go around a package. Recycle rolls of wrap that are torn or just about empty. Sharpies, scissors, tape, and gift tags are stored together in a smaller container so when I’m ready to wrap I have everything I need.

I always hate for the Christmas season to be over. The sights, the sounds, the smells – I love all of it. But because I was so organized in how I put everything away this year unboxing it all next year will be a breeze.

Memories…Time to Tackle Photos

Photos, photos,
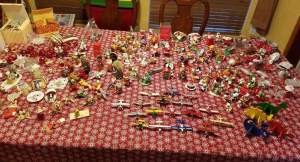
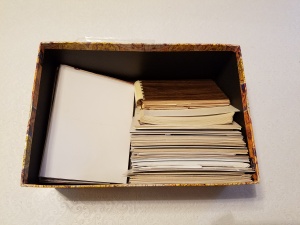
At the end of January, I finally decided to tackle photos, one of the last of the KonMari categories. I know, I know – four months prior I wrote that I was almost finished. And that’s true…I just knew that was not the right time to start. With the holidays behind me, this was the perfect time. And honestly, as far as photos go, half the battle is just figuring out where to start. In addition to my 60-plus photo albums, I had a box full of loose photos and pictures in frames that were tired and needed to be RE-tired. I cleared the dining room table so I’d have a large surface to work on and got busy.

Remove Pictures from Frames First

I knew that I’d be making changes to the photos I wanted to display so I emptied all of the frames first. I kept just a few of the better frames that I knew would coordinate well no matter where I placed them and filled a pretty good sized storage tub with the rest. Off to Goodwill they will go!

Sort Loose Photos

Next up were all of the loose photos that I had. By loose, I mean pictures that weren’t in a photo album for whatever reason. Some were the pictures that I’d just removed from the frames. Some were photos that had been given to me over the years by folks who thought I might want them.  I’d already been through them once last summer, so all I was left with was one photo storage box which didn’t seem so bad – until I started to actually lay out all of the pictures.  It’s hard to believe that what came out of the box in the image on the left resulted in the mass quantity you see in the image on the right.

Believe it or not, those photos are in piles that actually mean something! I had random categories in my head – old family photos, vacations, other people’s children, college, etc. just to give me some way to make sense of them.

Decisions, Decisions

The thing about sorting photos is that you pretty much have to touch every single one of them in order to decide what to do them. And when you start doing that – well, then this happens:

familycircus

After taking photos of photos with my phone and texting them to my daughter and family and the friends in those pictures, hours would have passed. So my advice is this – take the time and enjoy it. The whole reason we take (and keep) pictures in the first place is because we want to preserve and enjoy those memories. So enjoy the trip down memory lane. Just know that that detour, like any other, is going to cost you time.

I handled every single loose photo and discarded a lot of them – dozens. And I feel good about that. Of what was left, some were returned to the album they had originally come out of, some were set aside to be framed as part of a family collage I want to make, and the others went back into the photo box. Although, as you can see, that box is less than half as full as when I started.20170219_162010

How you decide on which photos to keep is, I believe, highly personal. Some people don’t want to keep photos where they don’t look their best. Others might want all traces of a certain memory (whether that be a person or event, good or bad) gone completely. Only you can make that decision. I kept what I wanted, closed up the box, and put it on a shelf with the photo albums.

Next Steps

Logically speaking, my photo albums should come next in this process. Full disclosure – as committed as I am to the KonMari process, Kondo and I differ mostly when it comes to photos, not only in the process but in what you should keep. If you truly KonMari your photos, you will take every single one of them out of their respective albums so that you can handle each one to determine whether it really needs to be kept or not.  Folks, I have over 60 albums. We are talking THOUSANDS of photographs. I am not doing this. Not because I don’t have the time but because I just don’t want to.  It’s not that important to me at this time to reduce the number of photo albums I have. That is not to say that sometime down the road I might not revisit this but for now, the number of photo albums doesn’t bother me near as much as the number of t-shirts we once had in this house so I’m okay with keeping them.

What I did do, however, was date them on the inside cover so that I can easily see what time period they are from, as not all of the photos have a date stamp on them. (Remember that? What a way to ruin a beautiful photo.) And I have a few albums that I am going to have to take apart because the adhesive has dried up and the pictures are falling out. I have those set aside to work on at another time. I might save them for the triple-digit heat days this summer when it is just too darn hot to leave the house!

Going Forward

Taking photos digitally whether it is with a real camera or your phone has made it so much easier to take lots and lots of pictures but not all of them need to be saved or printed. So these days when I do decide to print photos, I am much more judicious so that I don’t end up with a lot of photos that aren’t worthy of display either in a frame or an album. And I’ve become quite fond of making digital photo books using the various services that are out there. The great thing about those is that you typically only choose the best photos. And even if you choose a hard bound book, they take up a lot less space. So even if I haven’t stuck to KonMari in my old photos, I am keeping her principles in mind as I go forward with new ones.

Working through the process over the last two years, I am much more attuned to what brings me joy. It is not uncommon for me to look at an article of clothing or an accessory that I kept after the initial purge and decide just in that moment that it’s not doing it for me anymore.  I don’t agonize over those decisions as I would have before I discovered KonMari. So it is entirely possible that I will revisit the photo albums at a later date. And I apologize to anyone who came to this blog hoping to hear how I tackled those but I promise, when/if I choose to go through that process, I will detail it here.

But the point I want to make is this – don’t bully yourself into getting rid of anything, photos included, that you don’t want to. That is not the intent of the KonMari process at all. The idea is to surround yourself only with the things that mean the most to you so that you enjoy them and do not feel burdened by them. Slowly but surely, I am getting there – and you will too.

The Journey’s End…Almost

helloI can finally say that I am almost finished with the KonMari of my house. It’s been over a year since I began, but as I’ve said in earlier posts, life sometimes gets in the way. That and the fact that being retired gave me absolutely no concrete deadline to finish- and I’m a person who needs deadlines to keep me going. So let me fill you in on where I am in the process now.

Sentimental – Work Related

I spent 30 years in education all in one school district. 28 of those years were spent at one school. In those 28 years, I changed rooms only four times, so I didn’t cull much. And being a teacher, you keep everything – “just in case”. So I brought home with me the contents of a four-drawer file cabinet that contained every appraisal, certificate, note – you name it – that I received over 30 years. I knew I wouldn’t continue to keep all of it, but I needed to be in the right mindset to go through it all to make the decisions about what would remain. After being retired a year, I could feel that the emotional attachment was lessening, so I opened the tubs and began my trip down memory lane.

I read through my very first teaching evaluation when I was as green as green could be. It was done by hand on the old, familiar, white-pink-yellow carbon backed paper of the time. It was a 1st-grade science lesson that somehow incorporated the making of paper pinwheels that the students affixed to their pencils with a straight pin. (Our evaluations were called dog-and-pony shows back then.) Not surprisingly, I had plenty of room for improvement. I saved that appraisal. As I went through the folders, I could mark the evolution of technology by those appraisals – from handwritten entries on carbon-backed paper to handwritten entries on dot-matrix printed forms to handwritten entries on laser printed sheets to all-electronic input only to be printed for a signature.

As our technology improved, so did I as a teacher. I kept one appraisal from each of the varying incarnations, an additional one if I found one that meant more to me. I kept every single note I had from a student or parent. I kept all of the positive notes I received from my principals – and even a couple of the negative ones too. I kept a few pieces of student work that held meaning for me, and the 5th-grade signature t-shirts that we had made each year. I kept copies of the letters I wrote to my principals, superintendent, and the school board over various issues that raised my ire over the years. Yearbooks and lanyards stay. I kept the desk sign with my maiden name from my first years of teaching and the door sign with my married name thereafter.

20160927_112652
30 years of teaching

I laughed, I reminisced, and I read aloud bits and pieces to my husband. I gave thanks for those 30 years – for helping to shape the person I am today, for introducing me to incredible women who have become life-long friends, for putting all those children in my life, some of whom I am still close to today. Then I put the lid on the tub and put it on a shelf. I am grateful for everything those items represent but now it is time to move forward.

Other People’s Stuff

You can’t KonMari other people’s stuff but if you’re lucky, they’ll start doing it on their own. My daughter came home for a couple of weeks over the summer. More than likely, she will never live home again, so she was agreeable to going through her room and doing a final purge-and-sort. Her room can now serve as a proper guest room.

My husband, however, has had the biggest transformation.  I have felt like the walls of the garage were – both literally and figurately – closing in on us. But the idea of simplifying has caught on with him as well, so he finally tackled a good portion of his garage clutter. He had fives sets of 5-shelf shelving units. He now has one – ONE. He still has not parted with any of his Coke memorabilia, but the progress he did make has been astounding. And we now have more room to store his Coke stuff (out of sight, mostly), so I am okay with that. I kept some of my junior high t-shirts – I can hardly begrudge him this!

He has come to realize as we’ve gotten older that, yeah, he could do a lot of the home repairs and projects himself, but he doesn’t always want to. Paying someone else can sometimes be more economical – and less stressful. So that made it much easier for him to part with junction boxes, three of the five heavy duty staple guns, and numerous other workshop items.  Except for the metal tape measures – he has over a dozen of those – and I have no idea why.

Sell, Donate, Toss

I’m not a huge fan of having a garage sale – I like the money, but not the effort – but we had too much stuff to just give it all away, so we had our second and final garage sale of this process. And a large portion of what we sold this time were storage items –  shelves, bins, and crates. When you declutter, you have much less need for places to store things. And my husband didn’t bat an eye. He said if he kept the shelves, he’d find things to put on them. No storage, no flat surface – no clutter. We sold a lot, we donated a lot, and the trash/recycle men will be cursing us this week. But we both feel so much lighter and freer.

What’s Next?

This should have been the end according to the KonMari method but I have saved photos for last. If you follow me, you know I have over 60 photo albums and a few boxes of loose photos as well. This is a problem our children will never know because their photographic history exists on their phones and the cloud. But much like I love to read a real book that I can hold in my hands, I prefer printed photos for the memories that I want to keep. The holiday season is approaching so I will not tackle photos until January. I’m hoping for some cold, dreary days in front of the fireplace for that project. And there are still some small home projects that I want to complete before the holidays, so KM will take a backseat for the moment. But I will be back!

My Journey – One Year Later

poster
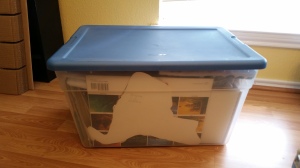
As I sat down to write this post, the phone rang. On my way to answer it, the sunlight was hitting the living room floor in such a way that I noticed it needed to be swept. So I took the phone call, then ran a broom across the floor. Twenty minutes later I came back to start the post – again. This is relevant only because it speaks to why, after a year, I am still not finished KonMari-ing my home. It’s not because I am easily distracted but because sometimes other things become more important. Even though I am not completely finished, a year seems like a good point to stop and take stock of how the process has gone so far, and to share this so you’ll know that the only timeline that matters is your own.

Successes

I think it’s important to talk about the successes and the progress made.  If you don’t note these small milestones, it can make it harder to continue. So here are just a few:

  • My closets and clothing drawers are still in perfect KM condition. I still fold all of my clothes into neat rectangles. Yes, it takes a while to fold the laundry, but there are only two of us and I find that I really don’t mind it. I still continue to discard items as I find they no longer bring me joy – or I don’t like them anymore – or they don’t fit well. Whatever the reason, the only clothes in my closets are the items I want there. What’s more – I’m much more judicious about what I purchase and bring into the house.
  • My husband and daughter both got on board. I’m fairly certain my husband could benefit from another round through his closet, but the first one produced so many items to discard that I am not complaining. And the fact that he let me do is dresser drawers was an added bonus. My daughter still has about a half dozen tubs of childhood stuff in her closet, but she got rid of twice that. And those tubs will go with her when she moves into her first permanent home.
  • No rebounding. The kitchen cabinets have remained neat and clutter free, I keep much less of the paper that comes into the house than I used to, and the last time I printed photos I only printed the best ones.
  • We didn’t buy the t-shirt. Yep – I can’t even think of the last time a souvenir or commemorative one came into this house. Score one for us!

Hurdles

I hesitate to call anything a failure because I honestly don’t see the fact that a certain category has not been completed in that way. (A failure would be having to redo my drawers again.) But there have been some hurdles along the way which have kept me from being as far along as I had hoped by this point.

  • Emptying the attic and storage unit AFTER starting the process. Introducing more clothing and books and paper after those categories had already been done really threw a monkey wrench in the procedure. And it is why I thoroughly advocate Kondo’s recommendation to do all of a category at one time. If I had followed that advice, I might be finished by now.
  • You can’t KonMari other people’s stuff. Much of what came out of the attic and storage unit belonged to my husband and daughter. Hubby is still trying to determine what to do with boxes of collectibles. Progress is being made, but it’s his to make, not mine, even though I do feel the impact.
  • I took a few breaks. And I totally feel that they were necessary.  Getting rid of your stuff is not an easy task. Taking a step back to assess where you are can help keep you going. Some breaks weren’t by choice. The death of a friend, the health crisis of a family member – these things took precedence. And they helped to remind me that people are what’s important, not things – which is why I started this in the first place.

What’s Next?

So where do I go from here? Well, according to the KonMari Method, I’ve only got photos and sentimental items left. But I have sixty photo albums and am not 100% on board with Kondo’s recommendation for photos, so that will be a challenge. Since I’ve been waiting until I am completely finished to put some things away, many items are not in their final homes yet. Once I’ve gone through the sentimental items, I’ll be able to put many things in their proper place. Then I will know it is complete.

My ultimate goal is to help others, who are so inclined, to do what I have done. And if it helps me earn some retirement income, well then that will be great too. So, my journey is not finished yet but it is about to get back on track. I hope you’ll stay with me for the rest of the ride.

KonMari for the Classroom: The Short Version, Part 2

KMClassroomI wish I still had a classroom so I could have pictures to accompany this part, but you’ll just have to make do with your imagination. Remember, this is an abbreviated version so that you can get your classrooms going.  I will return to the full series and post it later so that if you want to do a full KonMari on your classrooms, you can. As I’ve said before, I love making order out of chaos – and I’m guessing your rooms are looking pretty chaotic about now. That’s okay; just keep referring to that vision to stay motivated. You’ll get there.

A Place for Everything

If you got rid of even one-fourth of what you started with, you should have freed up plenty of space in your storage closets and shelves.  When you start putting things away, you want it to make sense so that you’ll know exactly where to go to find things.  Kondo has two rules for storage, and I think they will work well for classrooms, too. She says, “Store all items of the same type in the same space, and don’t scatter storage space.”   I know that storage in classrooms can be limited, but if you think of each storage area as a zone which contains a particular type of item, I think you can make it work.  What follows are my personal recommendations; if you keep Kondo’s rules in mind and do what works for you, you will have storage space that functions well and keeps you organized.

Storage Closets

Since closets have doors, this is the perfect place to store the things that you do not need on a daily basis. Think of this as the “teacher only” zone. You don’t want to put in here things you want the kids to be able to access. You’ll group things that naturally go together (office supplies, art supplies, paper, etc.). Items you want easiest access to should be on the middle shelves, less necessary items on the top and bottom shelves. This is where you will store reserves of:

  • Office/desk Supplies
    • Pen, pencils, paper clips, staples, sticky-notes, etc. Shelf space in a closet is usually pretty tight, so I don’t recommend putting them into baskets or tubs, especially if they’re in boxes already.  File folders can go in this group also.  If they’re in a box, you can keep them there (unless the box is half empty or more). Store on their side so they take up less space.
  • Art Supplies (NOT paper)
    • Glue, paint, yarn, craft sticks, crayons, markers, scissors, etc.  Remember, these are only the spare/reserve items, not the ones you will use daily/weekly.  Anything that can stand on its own, should.  Anything not in a box (yarn, scissors, loose crayons, etc.) can go in shoe boxes or cheap baskets from a dollar store. This is a closet no one will see inside of – don’t spend a lot of money on cute storage.
  • Seasonal Items
    • Seasonal room decor (not posters or bulletin board items).  Again, anything that can stand on its own does not need to be in a storage container or basket.
  • Professional Books and Binders
    • Do you refer to these on a weekly basis?  If not, store them in the closet on an upper shelf since you won’t need them.
  • Paper
    • The only paper I recommend storing in the closet is paper that is in a package. Remember, this is excess paper that you won’t need regularly, so I would use the very bottom or very top shelves to store packages of extra construction, manila, notebook, and copy paper.
  • Everything Else
    • I’m not copping out here – I just can’t possibly  know what else you might be storing.  Just remember, this closet should only be for items you don’t need on a regular basis, and to which the students do not need access.  And stick with the  general rule that anything already in a box or with a flat bottom that can stand on its own does not need to be put inside another container. Save bins and baskets for loose items and those things that can’t stand on their own.

Open Shelving

I’ll be honest – I am not a fan of hanging curtains in front of this type of shelving. This is a fluid space – things are coming and going from here on a daily basis, so everything should be easily accessible, and curtains are a hindrance.  If you’ve been successful at the decluttering  you’ve done, you shouldn’t have anything to hide. Use the same standard for arranging items here – place in baskets and bins only those items that are loose or can’t stand up on their own.  Try not to overfill the shelves – a little bit of breathing room will also lend to a less cluttered feel.

  • Student Aids & Manipulatives (Hands-On Zone)
    • Choose a section of shelves to store all of the various teaching materials and manipulatives that the students use. If you teach math and/or science, you’ll likely have a variety of these items. I’ll call this the “hands-on” zone. These things need to be accessible for the students, so you don’t want them hidden in the closet.
  • Student Supplies (Supplies Zone)
    • This is where you will keep the extra paper, notebooks, folders, etc. to which the students will have access.
    • Use inexpensive stacking trays to store any letter-size paper
    • Paint coffee and soup cans to make cheap holders for pencils, rulers, markers, loose crayons. etc.
    • Construction/manila paper and other art supplies that are used frequently can also be kept here.
  • Books (Library Zone)
    • Any books that the students will use should be kept together.  Separate your classroom library – the books they’ll read for enjoyment –  from books that are related to their texts – ancillary items, consumables, etc.
    • More than likely, you are keeping all of your teacher editions on open shelves too.  That should be considered a “teacher zone”.  Keep the books that only you need apart from the books that the students need.

Continue with any other items you have that should be kept on open shelves. Follow the guideline for keeping like things together as much as possible.

Flatland

Some things won’t fit on a shelf, like posters and charts. Many classrooms have storage spaces specifically made to hold items like these.  If yours does not, you could purchase art portfolios or bulletin board storage boxes.  Want to go cheaper?  Use heavy-duty binder clips to keep posters or bulletin board display pieces together.  Hang from hooks on the inside of a closet door or in some other out of the way space in your room.  Still rolling up your bulletin board border?  Stop! It takes up too much space and is much harder to put up when it’s all curled.  Hang them from binder clips as well.

The Walls

Now that you are ready to start putting things on the walls, please remember this – less is more. Seriously. If you completely cover every inch of wall space, nothing stands out anymore.  A poster you hang for motivation or an anchor chart you display for student reference can be reduced to nothing more than visual clutter if there are too many of them. Start with the things you are required to have on display (a Word Wall, for example) and limit what else goes up to items that complement it.  Don’t mix your ELA posters and anchor charts with your math ones.

Personalize

Your vision for your classroom won’t be complete until you make it your own.  For me, this was always the most fun part – decorating and personalizing the classroom, and making it a place that the students would be happy to come to every day.  Make it bright and warm and inviting.  It should be a place that makes you happy, too.

Maintenance

Your classroom is going to be clutter-free and perfectly organized for about five minutes – then the students come in.  Maintaining all of your hard work will depend on the systems you put in place in your room, so be sure you have those procedures thought out before the students arrive.  Remember that vision you’ve been referring to?  Keep that handy.  If clutter and disorganization start to creep back, pull out that sheet and remind yourself of why you did all this hard work. Devote some time to getting things back on track.

Over 1,400 words and I still have a lot more to say on this topic!  But if you’ve stayed with me this long, you are off to a great start. Follow me on Twitter or subscribe to this blog and be among the first to know when I return to the full classroom series.  I’d love to see/hear some success stories, so please feel free to share.

Have a great school year!

KonMari for the Classroom – The Short Version

KMClassroomCrickets. That’s what I heard after my first post on getting rid of paper clutter in the classroom.  I’m not surprised; it was a lot of information and probably, a little overwhelming.  So rather than turn everyone off, I’m going to give you a streamlined version so you can get it done and get on with the new school year. While I do believe it is possible to KonMari your classroom by category, I know that may be impractical right now as many items are stored in boxes and cabinets, and you can’t readily see all that you have. So we are going to depart from Kondo’s category approach and declutter by area.  This is presuming you are unpacking the same room you were in last year and got to keep most things in place. If you are moving into a new room and it is empty, the second part of this post will be the most beneficial; if someone else left their clutter behind, well, keep reading here.

*Note – Teachers spend A LOT of their own money; I know I did.  I am not in any way suggesting that you be wasteful with district-purchased supplies, nor that you get rid of things you purchased with your hard-earned money. Only you know for sure what items will likely be provided by your school so that you do not have to keep an overabundance of items in your limited space.  Keep those thoughts in mind as you go through this, and do what will be best for you.

Storage Closets and Cabinets

Out of sight, out of mind probably means that your cabinets are full of items that you don’t use regularly (or ever). So let’s pare down so you’re left with only those items you need and use.

  • Writing Implements
    • Pens, markers, and high-lighters that are more than a few years old may have dried up. Test the ones you know have been in there the longest and chuck any that do not work. Still have more boxes than you’ll use in year or two? Stop hoarding!  Put them out for the students to use.
    • Pencils never go bad.  If you are hoarding these too, sharpen those suckers and put them out for the students.  I know we want them to be responsible and take care of their own pencils, but is it worth it?  Choose your battles – put out the pencils and move on.
  • Paper
    • I’m sticking by this one – if you’ve got loose sheets that are creased, curled, or wrinkled, recycle them. Same with half-used or mostly-used notepads and sticky-notes (especially if you have brand-new ones in front of you.)
    • How much is too much?  Look at the number of stacks of construction/manila/notebook paper you have.  Do you have more than you could possible use this year? Next year?  Are the kids going to be bringing in any more of this thanks to the supply list?  If you answered “yes” to any of these, it’s time to purge. Reduce what you’ve got by at least half. Recycle what’s torn, creased, or loose, and give what’s left to someone who needs it.
    • Are you storing notebooks and folders?  Do you have a planned use for them?  If not, recycle the used ones.  Again, if you have more than what you would use over the next couple of school years, reduce it by half.
  • Miscellaneous Supplies
    • This is everything else – paper clips, thumb tacks, staples, binder clips – all those odds and ends.  If they are things that you use regularly, keep them.  But again, how many boxes of staples do you need?  If you have more than two, that’s probably too many.  Think of this year and the next – keep what you need to get your through that amount of time, and remove the rest.
  • Teaching Aids
    • I don’t want to repeat this unnecessarily, so click here and scroll down to Teaching Aids & Informational Display Items for my suggestions.
  • Room Decor
    • Many teachers have a theme for their room decoration each year.  Some use the same year after year, some change it.  If you are keeping the same theme, go through your items and trash any that are damaged and beyond repair.  Keep only what will look best.  If you are changing themes, ask yourself if you really need to keep all of the decorations from the previous theme(s).

Box up all of the items you’ve removed from your cabinets and pass them on to the new folks in your building who could probably use them.

Open Shelving

This is a tricky area because it holds everything!  Remember, our goal is to make your vision for your classroom a reality. I’ve seen some teachers hang curtains over their shelves and claim that it was because it looked nice when really it was just to hide the clutter. Hang the curtains if you must and if they fit your vision.  But behind curtains or not, it’s time to declutter those shelves.

  • Books
    • Classroom Library – It took me a long time to put together my classroom library. Many years of getting free items from Scholastic and Troll book clubs, and taking from the pickings of a weeded library. It’s hard to part with books, but sometimes it is for the best.
      • Any book that is torn up or has missing covers or pages should really be sent to recycling.  If it is a well-loved book, jot down the title so you can try to replace it later.
      • Non-fiction books that have out-dated information (think Pluto). These should probably be recycled as well.
    • Textbooks
      • Out-of-adoption or sample textbooks, and consumable workbooks – Are you really using these or are they still there because getting rid of books feels wrong?  If they are out of line with current teaching standards, let them go.
    • Professional Materials
      • Training/Workshop Binders – In 1989, I took a summer writing course.  All of my writing samples and the workshop materials were contained in a 3-inch binder. When I changed rooms, it went with me. When I changed positions, it went with me.  Did I ever open it again after the workshop? No. Did my district continue to use that writing program? No.  When did I finally part with it? When I was cleaning out for retirement – in 2015.  If the workshop information is more than five years old, isn’t part of a plan that your district is still following, and isn’t something you are likely to ever need again, toss it.  If it is something your school or district has paid for, check with someone in charge and see what the policy is for removing it from your classroom.
      • Professional Books – Is the information still relevant?  Is it something you refer to frequently and always want to have on hand?  Is it something that was provided by your school/district that you must keep? If not, buh-bye.
  • Everything Else
    • It would be impossible for me to name every other item that you probably have lurking on those shelves, but I’m guessing manipulatives, baskets and other storage containers, odds and ends that you don’t know where else to place are among them.  Go through each shelf and pull out anything you have not used in recent memory and know you will not use this year.  If it is a personal item, what you do with it is your call (trash, donate, send to long-term storage).  If it is school/district property, you may have to keep it. Check with someone who would know if it can be taken out of your room.

A Place for Everything, Everything in Its Place

I am hoping that when you look inside your newly decluttered cabinets and closets you are seeing lots of empty space.  The same should also be true of your shelves – surely you now have a few empty ones. In my next post I will share tips on how to organize this new-found space to keep your clutter from coming back and to make your classroom a welcoming place for students.

KonMari for the Classroom: Paper – Day One

KMClassroomPaperSo, you’ve created your vision and are ready to tackle your classroom clutter – good for you! I’m convinced that even if you get no further than discarding extraneous paper in your classroom, you will have made a huge dent. That’s because so much of what we have in our rooms falls into this category.  I’m not even going to address what is in your file cabinets in this post – that’s a whole other ball of wax -I’m just focused on the paper you can see. So for now when I say “paper”, this is what I am talking about:

Paper

  • notebook paper
  • notebooks
  • newsprint
  • construction/manila/fadeless paper
  • notepads and sticky-notes
  • blank copy paper
  • chart tablets and chart paper

Decorative and Informational

  • posters
  • anchor charts
  • bulletin board border
  • bulletin board displays

Books

  • old textbooks
  • testing practice aids
  • professional books
  • books in your classroom library
  • binders from various conferences, workshops, and training events

This is by no means a comprehensive list, but it should get you started.

Plain Paper

Let’s start with plain old paper first.  Gather it up from all of its various locations – storage cabinets, shelves, your desk – wherever you have it stashed, and bring it all to one central spot in your classroom.  This will make it much easier to see how much paper you have amassed, and it will make it easier to sort into a manageable amount.

I’m going to suggest getting rid of all loose paper – if it’s in a package, great; if not, it’s out of here.  Unless you have trays to hold the loose paper, it gets torn, folded, and creased.  Send to the recycle bin. Now – if you have a neat stack of 200 sheets of notebook paper, I am not suggesting you get rid of it – that would be wasteful.  But random sheets, cheap construction paper that tears easily once out of the package, newsprint with torn edges – those are the things that should go. Keep clean notebooks that have never been used. Notepads and sticky-notes that have only a  few sheets left on them – recycle. You want to whittle this down until you are left with neat stacks of various papers, clean notebooks, usable notepads, and charts.

Look at what’s left – what do you have too much of?  Construction paper because it’s on the school supply list every year?  Sticky-notes because you can only order them in packages of 10?  Reduce those piles by at least half, more if you can honestly say you will not use up what’s left in the foreseeable future. Take your discards and set them by your classroom door so you remember that they are on their way out!

Teaching Aids and Informational Display Items

We typically find two different things on our classroom walls and bulletin boards – teaching aids and decorative items.  We’re going to tackle the educational ones first. Locate all of your informational display items (posters, anchor charts, etc.) and, just like with the plain paper, bring them all to one spot in your classroom.  Are there any that are out-of-date? (Solar system posters that include Pluto as a planet, for example.)  If the information on a teaching aid is no longer valid, it needs to go.  Are there any posters or charts that are not applicable to your current teaching assignment? Set those aside in a different pile.  Torn or faded? Corners so chewed up by years of stapling they won’t even hold a staple anymore?  If you can afford to replace them, then recycle the damaged ones.  If you can’t replace them, then make the best repairs you can (trim off the torn corners and laminate for added durability?), and place in your “keep” pile. If you have more than one poster or chart representing the same information, do you need to keep them both? Would you hang up both at the same time? If not, choose one to part with.

Continue this process until you are left with the best of the best of the teaching aids, anchor charts, and educational posters. These are the items that, even though you have to have them, fit the vision you created for your classroom.  All the items that are damaged beyond repair or out-of-date go to the recycle bin.  The duplicate items you just sorted through can be given to another teacher who might be able to use them, so set those by your classroom door since they are on their way out.  The items that are no longer useful for your current teaching assignment?  That’s a judgment call.  If you don’t want to get rid of them (a lot of money invested and you might end up back in that grade level), then it is fine to hang on to them.  If classroom storage is an issue, I would take them home.  But if you are okay parting with them permanently, then set them by the door as well.

On Their Way Out

If you are really committed to this, that pile by the door should be pretty sizable!  These are all items that are in perfectly good condition and could easily be used by someone else. What you do with those items may depend on your school building. At mine, we used to just set things we no longer wanted in our work room or lounge, or even in the hallway for others to take. You know what they say, one man’s trash… Whatever you do, it’s important that you get them out of your room so you are not tempted to keep any of it.

I’m going to stop here for brevity’s sake, and because I’m not sure you could get through more than this in one day anyway.  Next up will be books and the papers we use to make our classrooms pretty.

KonMari for the Classroom

KMClassroomWell, it is August 1, and for many, especially my educator friends here in Texas, that means another school year is on the horizon. Ready to tackle your classroom with a renewed sense of purpose and organization? Wondering how to KonMari your classroom? Well, you are in luck!  I’ve decided to share some ideas on this. I spent 30 years in education – 15 as a classroom teacher, 11 as a technology facilitator, and 4 as a media specialist. In each of those roles, organization was always a high priority for me.  I can’t function in a mess, and I truly believe that most students can’t either. Even if being organized wasn’t a natural state for my students, they learned to be at least for the time they were in my room. I had systems in place for everything from turning in assignments to selecting the desired lunch item.  I could go on and on about ways to keep the kids organized (and I will), but you can’t get them organized if you aren’t organized yourself.

Create a Vision

Before you start unpacking all the boxes and bins that were stored for the summer, I want you to create a vision for your classroom. In your perfect world, what does your classroom look like? What’s on the walls?  How are the shelves organized? What systems do you want in place for your students to promote self-sufficiency? Think about the atmosphere you want to create. How do you want it to feel for your students as they walk in each day?  Draw a picture, make a list, print out your favorite pins from Pinterest – do whatever you need to so that you have something tangible that represents your vision. Now I want you to tape it to a wall or tack it to a bulletin board so that you see it every day while you are preparing your classroom for the coming year. This will be your reminder of what’s important to you and will help to keep you on track.

How Will This Work?

We’ll tackle your classrooms in a similar way to how Kondo recommends doing your home – sorting by category, discarding first, and using the storage containers and spaces you already have.  When we tidy our homes with the KonMari Method, we all know the key question is,  “Does this spark joy?” But that question is not as likely to work here – before you know it, you’d have an empty room! But you can still approach it from a positive viewpoint.  So while you’re standing there holding a stack of old newsprint, ask yourself, “Is this something I really want to keep?”  “Is this still useful to me?”  I’m willing to bet that a large portion of what we have in our cabinets is there simply because it always has been.  It might have been something that was useful once, but it’s not any longer, and we just don’t take the time to dispose of it. Now is that time.

Don’t Buy Storage Bins

I know you – teachers are lured by pretty bins and tubs and baskets in matching or coordinating colors and patterns. And with back-to-school stuff out now, it all screams, “Buy me!”  But I beg you – don’t do it.  First of all, the storage bins themselves take up a lot of prime real estate.  Secondly, as you are discarding, you will probably free up space in the bins and baskets you already have.  Wait until you’ve discarded everything and then see if additional containers are still necessary


Change Your Mindset

This will be toughest of all.  Teachers are pack-rats by nature for a couple of reasons.  1) We don’t make a lot of money, so we tend to keep anything that we think can be of use, and 2) Our frugality makes us industrious, so we are convinced that everything can be used for something.  Stop the madness! Eliminate “just in case” as a reason for keeping things. When was the last time you actually did an art project in your classroom?  I bet it’s been long enough that you can probably let go of the paint and yarn and craft sticks (at least some of them, anyway).

I speak from experience.  Before I retired, I spent weeks going through old files and boxes. We all know things can change in an instant so even though I had been out of the classroom for fifteen years, I kept things “just in case” I had to go back.  Well, that never happened and even if it had, much of what I kept couldn’t have been reused. I’m pretty sure a worksheet I made using a Thermofax machine back in the ’80s would hardly be relevant today.

So today is step one – create that vision for your classroom, and display it prominently in your room.  Then get ready to make that vision a reality.

My next post will focus on the category you probably have the most of – paper. Subscribe to this blog or check back in a couple of days, and be ready to KonMari your classroom.

Ditching the Digital Clutter 3: Photos

Ditching the Digital Clutter 3-I am willing to bet that we have more photos stored than any other type of file. Gone are the days when you were more judicious about what you took a picture of because you only had so many pictures left on the roll – or flashes left on the bulb.  You might have even been mindful when using your digital camera depending on how much device and SD card storage you had.  But with today’s smart phones, our cameras are with us 24/7 – and we use them almost as often.  Most times, I don’t even use the camera to take a picture of something beautiful, or a person, or an event. I take a picture of a book cover to remind me of a book I want to read later, or of a review in the newspaper of a hamburger joint I might want to try, or a price sign in the store of an object I might want to buy – just not at that moment.  I have a ton of these types of photos using up my device or SD card or cloud space.  Yes, they’re convenient to have, but I don’t  want to save them for posterity. How many bad selfies do you have saved?  Or multiple photos of the same shot just to be sure you got a good one?  Rainbows?  Fireworks?  The reality is, we have a lot of junk photos taking up a lot of valuable storage space.  Since I don’t want to buy extra space, I’m going to have to devote some time to culling the photos and deciding what really needs to stay.

Start with Incidental Photos First

These are all those junk photos that I mentioned above, the ones you need just for a short time.  How and where you store your photos will determine how you go about discarding them.  I have my phone set to back-up to Google Photos automatically, which is both a blessing and a curse.  It’s great in that my photos are safe should I lose or damage my phone.  It stinks because ALL of them are backed up, even the junk ones.  Find the storage location that will allow you to delete a photo just once, yet also remove it from both cloud and device storage.  That will help cut down on the amount of time you are devoting to this tedious task.

Delete Multiples

Do you really need five shots of the family posing in front of that waterfall?  Or three shots of your dog sleeping on your lap?  Or all the dozens of photos you took of your grandchild opening every single Christmas present?  Probably not.  Choose the best ONE in front of the waterfall.  Unless the dog’s sleeping on your lap is unusual, you probably don’t need any of those (but I won’t judge you for keeping one).  And try to whittle event photos (Christmas, birthdays, vacations, etc.) down to the fewest possible. Keep the best ones, the ones that capture the moment and the emotion that you truly want to remember –  the ones that bring you joy.

To Print or Not to Print?

If you are of a certain age, you are probably still printing out photos and placing them in photo albums, or at the very least, using a service like Shutterfly to make photo books. But I couldn’t tell you the last time my 23-year-old daughter printed out a photo.  Yes, digital photos are convenient, but I just don’t get that same feeling as I do from going through a photo album.  But printing is going to be a personal preference; I still do it.  And then I painstakingly put them into albums and caption the photos. If you’re not likely to go to that trouble, then just stick with your digitized ones.

Photo Files on Your Computer

In addition to whatever you have on your phone and/or in the cloud, you probably have photos stored on your computer as well.  If you deleted photos you didn’t want when we worked on files, you are one step ahead!  If not, now is the time to go through all those pictures and discard the ones you don’t want or need.  If you have a lot of photos, it might be a good idea to sort them into separate folders – you can create folders based on date, event, subject matter – whatever makes sense for you.  You’ll want to back these up as well, but image files tend to take up a lot of space.  If you don’t want to use precious cloud storage, upload your photos to a site like Shutterfly or even Walgreen’s.  Those are great options if you intend to make prints, but even if you don’t, your photos are always there. (Of course, you will need to create an account.)

Finished!

Tackling your digital clutter is every bit as time-consuming as tangible clutter.  And it is easier to accumulate because it doesn’t take up any physical space – which also means it is easier to rebound and find yourself in the same mess.  So be sure you stay on top of your digital life.  Clear out e-mails on a weekly basis, dump old unnecessary files every few months, and try to handle your photos almost as soon after you take them as possible.

So, what’s next?  If you’re a teacher, my next post will be for you – KonMari in the Classroom. Don’t miss it!

Ditching the Digital Clutter 2: Files

Ditch the Digital Clutter 2 (1)Now that you’ve cleared out your e-mail and are excited by that progress (just remember to stay on top of it), we’ll move on to the files on your computer.  For most of us, digital storage, even in “the cloud”, is not unlimited; at some point, you will run out of space.  But even if you didn’t, even if you could have all the storage you needed and then some, for free, for EVER – would you really want that? The answer (I hope), is a resounding NO.  Just think about it…think back to all of the paper clutter you’ve already purged thanks to KonMari. Think about all of the paper that comes into your house on a regular basis. Now imagine throwing NONE of it away – ever.  I don’t care how neatly you might have it sorted, you do not need nor want every sheet of paper you’ve ever touched. And yet, digitize a file and somehow it becomes acceptable to keep it because it’s not taking up any space. But it is – and more importantly, having all that excess makes it difficult to find the files you actually need, when you need them.

I’m going to focus on how to purge and sort your personal computer, but these can also apply to work machines as well. Odds are your employer would prefer you not clog up precious server storage with lots of junk either. And adhering to some of these suggestions might also keep you from losing files.

Hard Drive and Cloud Storage

Even if you have all of your files on your computer, that might not be the only place you want to save them.  Computers die and with them go your files, so it is a good idea to have a back-up.  You could save to an external drive, but being a mechanical device, it is also prone to fail at some point, so your best bet is to use cloud storage.  Whether you choose to save all files to your hard drive and back up to the cloud, or save directly to the cloud is entirely up to you and likely determined by how old you are.  Digital natives (mainly millennials and younger) would likely never dream of saving to a computer; they are more likely to be cloud folks.  Digital immigrants, however, are less likely to trust something we can’t physically touch, so we tend to store in both.  The steps I will give you will work either way.

If you are using these tips to clean up a work computer, you are probably using server or cloud storage.  Either way, remember that personal files stored on work computers, servers, or cloud storage become the property of your employer and are not private. So it’s best to remove your personal items from your work computer for your own piece of mind.

Time to Purge!

As always, we are going to discard first, sort later.  For reasons I have never understood, some folks like to use their desktop screen as file storage.  Not only does this make for an incredibly cluttered desktop, but it also makes it a little hard to find anything. About the only time I put anything on the desktop is if it is a temporary file, something that I need just for that moment to attach to an e-mail or to download and print. Once I’ve used it, I move it to the trash and get it off my desktop. If you have files or photos on your desktop, trash any that you know you no longer need. Leave what is left and we’ll revisit them later in the process.

Access your file storage (whether hard drive or cloud) and set the window to list or details view instead of thumbnails or icons. This will allow you to see more of what you have at one time.  Also, we want to be able to see not just the name of the file, but the date, type, and size as well.

  • Sort by Date
    • Click on the Date Modified header to sort the list so that the oldest items are on top.
    • Ignore the folders and start with individual documents. These may be text documents, spreadsheets, PDFs, etc.
    • If you named your files well, it will be easy to tell whether or not you need to keep or delete the item.  If not, well…
      • Open each one item are unsure of
      • If you need to keep it, rename it so that you’ll know what it is
      • If not – delete!
    • Continue through the list of items until you’ve deleted all you do not need

***I am going to address photos in another post, but if you come across ones that you want to delete now, by all means – go for it!

  • Folders
    • Open each folder and follow the same procedure for individual files
    • If you empty an entire folder, delete it

If you are like me, you have files on your computer and files in the cloud. I have computer files, Google Drive files, and Dropbox files.  At the moment, there is no rhyme or reason to this, but as I am sharing these tips with you, I am also cleaning up my own mess.  So if you have multiple file locations, before you do any sorting, you’ll need to go in and follow the procedure above for deleting all of your extraneous documents.  While you are at it, if you have thumb/flash drives laying around, you’ll want to round them up as well. See what’s on each and if there are things you need to save, move them to your computer or cloud storage now for sorting.

Creating Folders and Sorting Files

Now that you’ve cleaned out all of the unnecessary files, it is time to sort them.  You wouldn’t just open a file cabinet and dump papers into the drawer, so you don’t want to do that with digital files either. How you sort your files is going to be determined by how many you have and how detailed you want to be. If you don’t have a lot of files, you might consider creating folders for each year (2016, 2015, etc.) and then just place the files into the corresponding folder.  If that is too broad and you prefer to sort by subject, you can do that instead.  Skim through your files and see which ones seem to naturally belong together.  Maybe you have a lot of recipes,  files related to a hobby, or spreadsheets for tracking expenses.  Create a folder for the group and name it (ex. Recipes), then move all of the related files to that folder.  Continue in that way until most, if not all, of your “loose” files have found a home in a folder.  If you have a few that don’t seem to fit anywhere, I think it is fine to leave them outside a folder.  You might find that later on you add files that can be grouped together to create a new folder.

And just in case you think I forgot, it’s time to go back to your desktop files.  Move them to the new folders you’ve just created. Clean desktop, sorted files…doesn’t that feel good?

Backing Up Your Files

All of this work is for naught if you don’t have your files backed up in some way. If you’re main storage is already on the cloud, then congratulations – you are done here!  But if you just did all of this work to the files that exist only on your computer, then you have a few more steps to go – but they are more than worth it.  There are many free cloud storage options available, and you may already have access through your e-mail provider or operating system.  Most can also be integrated with your computer so that they are accessible as a drive, which makes saving and retrieving files a breeze. Do some research to determine the best cloud storage provider for your needs.  Then set up your account and sync it with your computer. Once that is done, you should easily be able to move or back-up all of the files from your computer to your cloud storage.  Not only will your files be spared from damage to or loss of your computer, but you will have access to those files anytime, anywhere, from any device.  The digital natives in your life will be very impressed!

Maintenance

As with your e-mail, you have to stay on top of this if you don’t want to be drowning in loose files again.

  • Place items on your desktop TEMPORARILY – ideally, for no more than 24 hours. After you’ve done what you need to with the file, trash it.
  • If you have an item you must save, be thoughtful about which folder you put it in so that you can find it easily later.
    • If the file was created by someone else, be careful that you don’t change the file extension as that and render the file useless
    • If you created the file, give it a name that makes sense (moms_applepie)
  • Go back through your files at least once a year and see if you need to purge again. It will be much easier to do going forward now that you’ve done the hard part.

E-mail…check!  Computer and cloud files…check!  What’s next?  Digital photos…