I wish I still had a classroom so I could have pictures to accompany this part, but you’ll just have to make do with your imagination. Remember, this is an abbreviated version so that you can get your classrooms going. I will return to the full series and post it later so that if you want to do a full KonMari on your classrooms, you can. As I’ve said before, I love making order out of chaos – and I’m guessing your rooms are looking pretty chaotic about now. That’s okay; just keep referring to that vision to stay motivated. You’ll get there.
A Place for Everything
If you got rid of even one-fourth of what you started with, you should have freed up plenty of space in your storage closets and shelves. When you start putting things away, you want it to make sense so that you’ll know exactly where to go to find things. Kondo has two rules for storage, and I think they will work well for classrooms, too. She says, “Store all items of the same type in the same space, and don’t scatter storage space.” I know that storage in classrooms can be limited, but if you think of each storage area as a zone which contains a particular type of item, I think you can make it work. What follows are my personal recommendations; if you keep Kondo’s rules in mind and do what works for you, you will have storage space that functions well and keeps you organized.
Storage Closets
Since closets have doors, this is the perfect place to store the things that you do not need on a daily basis. Think of this as the “teacher only” zone. You don’t want to put in here things you want the kids to be able to access. You’ll group things that naturally go together (office supplies, art supplies, paper, etc.). Items you want easiest access to should be on the middle shelves, less necessary items on the top and bottom shelves. This is where you will store reserves of:
- Office/desk Supplies
- Pen, pencils, paper clips, staples, sticky-notes, etc. Shelf space in a closet is usually pretty tight, so I don’t recommend putting them into baskets or tubs, especially if they’re in boxes already. File folders can go in this group also. If they’re in a box, you can keep them there (unless the box is half empty or more). Store on their side so they take up less space.
- Art Supplies (NOT paper)
- Glue, paint, yarn, craft sticks, crayons, markers, scissors, etc. Remember, these are only the spare/reserve items, not the ones you will use daily/weekly. Anything that can stand on its own, should. Anything not in a box (yarn, scissors, loose crayons, etc.) can go in shoe boxes or cheap baskets from a dollar store. This is a closet no one will see inside of – don’t spend a lot of money on cute storage.
- Seasonal Items
- Seasonal room decor (not posters or bulletin board items). Again, anything that can stand on its own does not need to be in a storage container or basket.
- Professional Books and Binders
- Do you refer to these on a weekly basis? If not, store them in the closet on an upper shelf since you won’t need them.
- Paper
- The only paper I recommend storing in the closet is paper that is in a package. Remember, this is excess paper that you won’t need regularly, so I would use the very bottom or very top shelves to store packages of extra construction, manila, notebook, and copy paper.
- Everything Else
- I’m not copping out here – I just can’t possibly know what else you might be storing. Just remember, this closet should only be for items you don’t need on a regular basis, and to which the students do not need access. And stick with the general rule that anything already in a box or with a flat bottom that can stand on its own does not need to be put inside another container. Save bins and baskets for loose items and those things that can’t stand on their own.
Open Shelving
I’ll be honest – I am not a fan of hanging curtains in front of this type of shelving. This is a fluid space – things are coming and going from here on a daily basis, so everything should be easily accessible, and curtains are a hindrance. If you’ve been successful at the decluttering you’ve done, you shouldn’t have anything to hide. Use the same standard for arranging items here – place in baskets and bins only those items that are loose or can’t stand up on their own. Try not to overfill the shelves – a little bit of breathing room will also lend to a less cluttered feel.
- Student Aids & Manipulatives (Hands-On Zone)
- Choose a section of shelves to store all of the various teaching materials and manipulatives that the students use. If you teach math and/or science, you’ll likely have a variety of these items. I’ll call this the “hands-on” zone. These things need to be accessible for the students, so you don’t want them hidden in the closet.
- Student Supplies (Supplies Zone)
- This is where you will keep the extra paper, notebooks, folders, etc. to which the students will have access.
- Use inexpensive stacking trays to store any letter-size paper
- Paint coffee and soup cans to make cheap holders for pencils, rulers, markers, loose crayons. etc.
- Construction/manila paper and other art supplies that are used frequently can also be kept here.
- Books (Library Zone)
- Any books that the students will use should be kept together. Separate your classroom library – the books they’ll read for enjoyment – from books that are related to their texts – ancillary items, consumables, etc.
- More than likely, you are keeping all of your teacher editions on open shelves too. That should be considered a “teacher zone”. Keep the books that only you need apart from the books that the students need.
Continue with any other items you have that should be kept on open shelves. Follow the guideline for keeping like things together as much as possible.
Flatland
Some things won’t fit on a shelf, like posters and charts. Many classrooms have storage spaces specifically made to hold items like these. If yours does not, you could purchase art portfolios or bulletin board storage boxes. Want to go cheaper? Use heavy-duty binder clips to keep posters or bulletin board display pieces together. Hang from hooks on the inside of a closet door or in some other out of the way space in your room. Still rolling up your bulletin board border? Stop! It takes up too much space and is much harder to put up when it’s all curled. Hang them from binder clips as well.
The Walls
Now that you are ready to start putting things on the walls, please remember this – less is more. Seriously. If you completely cover every inch of wall space, nothing stands out anymore. A poster you hang for motivation or an anchor chart you display for student reference can be reduced to nothing more than visual clutter if there are too many of them. Start with the things you are required to have on display (a Word Wall, for example) and limit what else goes up to items that complement it. Don’t mix your ELA posters and anchor charts with your math ones.
Personalize
Your vision for your classroom won’t be complete until you make it your own. For me, this was always the most fun part – decorating and personalizing the classroom, and making it a place that the students would be happy to come to every day. Make it bright and warm and inviting. It should be a place that makes you happy, too.
Maintenance
Your classroom is going to be clutter-free and perfectly organized for about five minutes – then the students come in. Maintaining all of your hard work will depend on the systems you put in place in your room, so be sure you have those procedures thought out before the students arrive. Remember that vision you’ve been referring to? Keep that handy. If clutter and disorganization start to creep back, pull out that sheet and remind yourself of why you did all this hard work. Devote some time to getting things back on track.
Over 1,400 words and I still have a lot more to say on this topic! But if you’ve stayed with me this long, you are off to a great start. Follow me on Twitter or subscribe to this blog and be among the first to know when I return to the full classroom series. I’d love to see/hear some success stories, so please feel free to share.
Have a great school year!
 So, you’ve created your vision and are ready to tackle your classroom clutter – good for you! I’m convinced that even if you get no further than discarding extraneous paper in your classroom, you will have made a huge dent. That’s because so much of what we have in our rooms falls into this category. I’m not even going to address what is in your file cabinets in this post – that’s a whole other ball of wax -I’m just focused on the paper you can see. So for now when I say “paper”, this is what I am talking about:
 Well, it is August 1, and for many, especially my educator friends here in Texas, that means another school year is on the horizon. Ready to tackle your classroom with a renewed sense of purpose and organization? Wondering how to KonMari your classroom? Well, you are in luck! I’ve decided to share some ideas on this. I spent 30 years in education – 15 as a classroom teacher, 11 as a technology facilitator, and 4 as a media specialist. In each of those roles, organization was always a high priority for me. I can’t function in a mess, and I truly believe that most students can’t either. Even if being organized wasn’t a natural state for my students, they learned to be at least for the time they were in my room. I had systems in place for everything from turning in assignments to selecting the desired lunch item. I could go on and on about ways to keep the kids organized (and I will), but you can’t get them organized if you aren’t organized yourself.
 Well, the sixty photo albums are going to have to wait because I was inspired to focus on something else. I planned on dealing with this after I finished the house, but after I saw Marie Kondo’s post about tidying up your laptop, I decided to shift gears. Time to tackle your digital clutter.
 Whether it’s losing weight, tackling your inbox, or KonMari-ing your home, we are all motivated by making progress. Numbers on the scale get smaller, the list of emails grows shorter, clutter is reduced – and we feel compelled to keep on. I believe this is why Kondo is so adamant that you take on your tidying festival in one fell swoop. She knows that when you don’t see progress it is easy to just throw in the towel and assume this is just how it’s going to be. I thought I was making progress, cruising right along through this KonMari Method – until I wasn’t. We had a couple of missteps (see my post
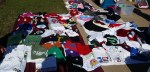


 Last week in our KonMari Facebook group we were challenged to identify a task we wanted to complete by the end of the week. As you may have already discovered about me, I’m a big fan of deadlines (most of the time), so I was on board. My goal was to declutter my desk area. It’s where I write this blog and pay bills and, even in this digital age, I still have a tremendous amount of paper clutter. (Though I did take five boxes to the shred truck a couple of weeks ago.) The desk was starting to get overrun and was not the most conducive space for writing, so I started the discard process. As I mentioned in an earlier post, I had too many pairs of scissors, so the extra ones went, along with some blank CDs and envelopes, a box of Crayola markers, and half-a-dozen flash drives. I was left with a much more orderly space that invites me to sit and work (or pay).